New World Tank Build 2023 - The Ultimate Guide for PvE
 by BagginsTV — Published on
 In this guide, you will find the best tank builds and all the key information for tanking in PvE, from explanations of weapon choices to skill trees for each load out, plus guidance on everything from necessary gems to playstyle tips to ideal armor and, if applicable, where to farm each piece.

Intro
This guide is brought to you by BagginsTV, in collaboration with Jools and NWDB.
All information is based on the latest version of New World, and is accurate for the Brimstone Sands update.
If video guides are more up your street, then all the information can also be found in my YouTube video right below.
Baggins' video guide is up to date with Season 3. The written guide rework is a work in progress.
3
If you're more of a reader, however, or are looking for all the handy links and item info pages all in one place, then read on!
Weapon Choices
Sword &Amp; Shield + War Hammer
This is the most standard Tank build, and is both popular and versatile. Due to the War Hammer’s high CC abilities, this is a great build for team play.
Sword &Amp; Shield + Hatchet
This is a more aggressive build. It is damage-orientated, with added survivability from the hatchet. Commonly used by solo tanks.
Greatsword + War Hammer
One of the new tank builds that has been introduced with the Brimstone update. It has good damage potential from the Greatsword, and again the War Hammer provides some important CC.
Greatsword + Hatchet
This is the build to choose if you just want to do mega damage. This build focuses on constant damage output with a nice amount of self-sustain.
Note: Sword & Shield + Greatsword could possibly work, but the weapons feel like they are both primary choices, as neither offers much as a secondary weapon due to the way their abilities and passives work.
Attributes
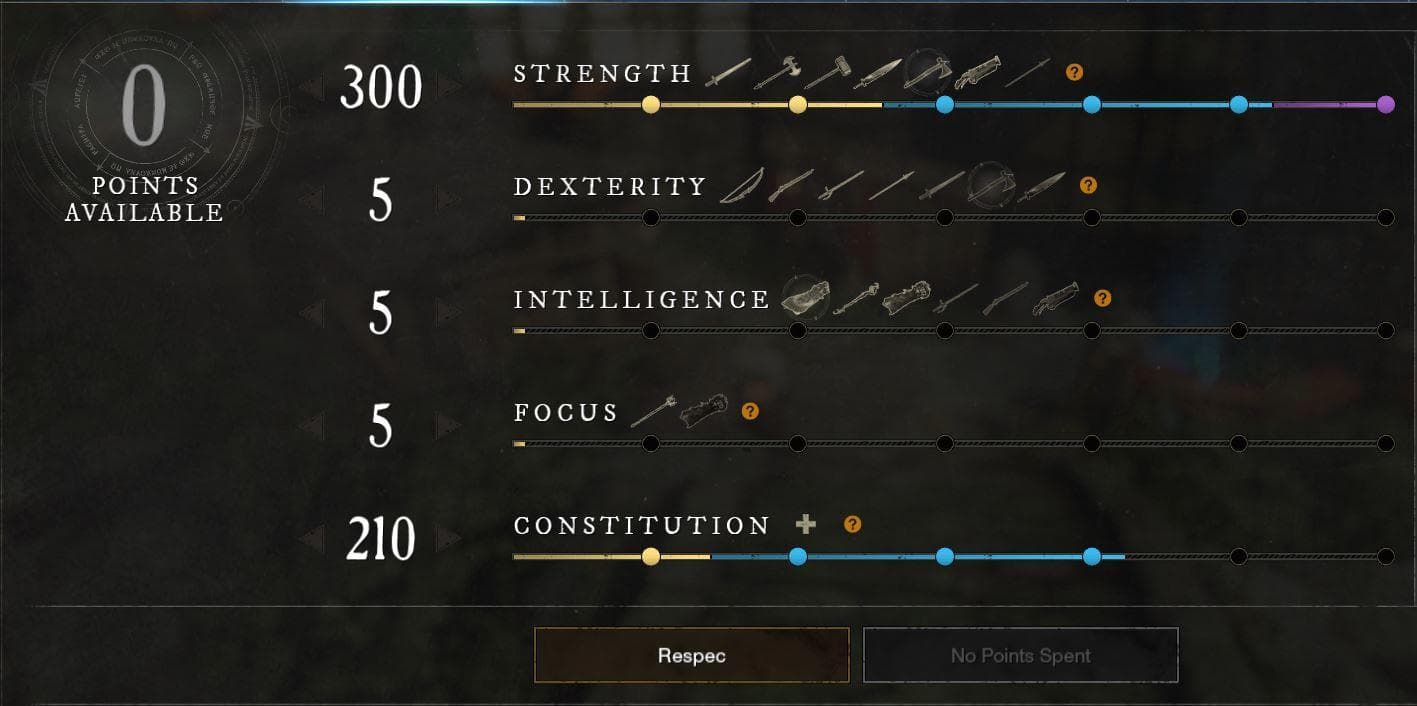
300 Strength + 210 Constitution
This is an aggressive tanking build, and is ideal for those who want to be in their enemy's face. It gives GRIT on all Light/Heavy attacks, but as a build is best utilized alongside a good healer and team communication.
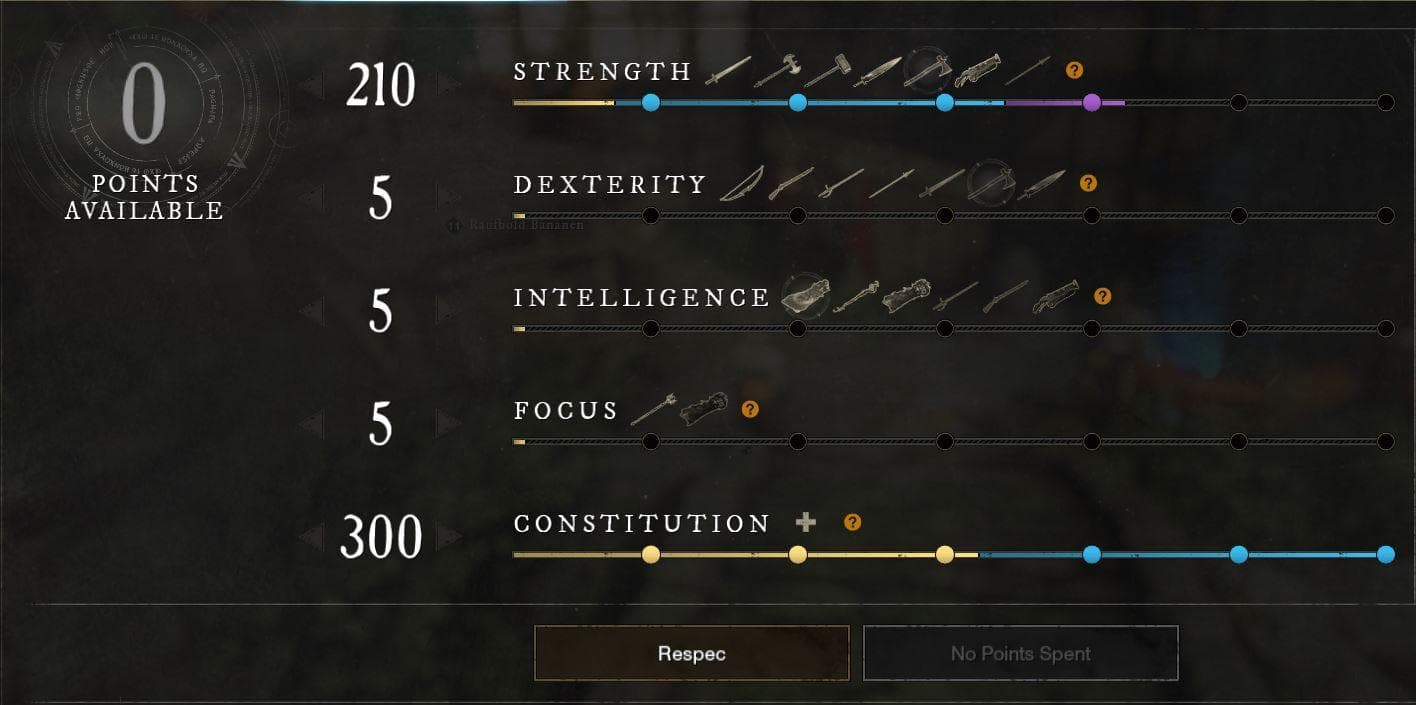
210 Strength + 300 Constitution
The more defensive tanking build, due to its greater means of survivability. This is an ideal build for solo tanks, and is also useful for when you are in an uncoordinated or group finder team.
Weapon Skills
Below are the most optimal skill builds to use. Use either the Aggressive or the Defensive versions for the weapon pair of your choice.
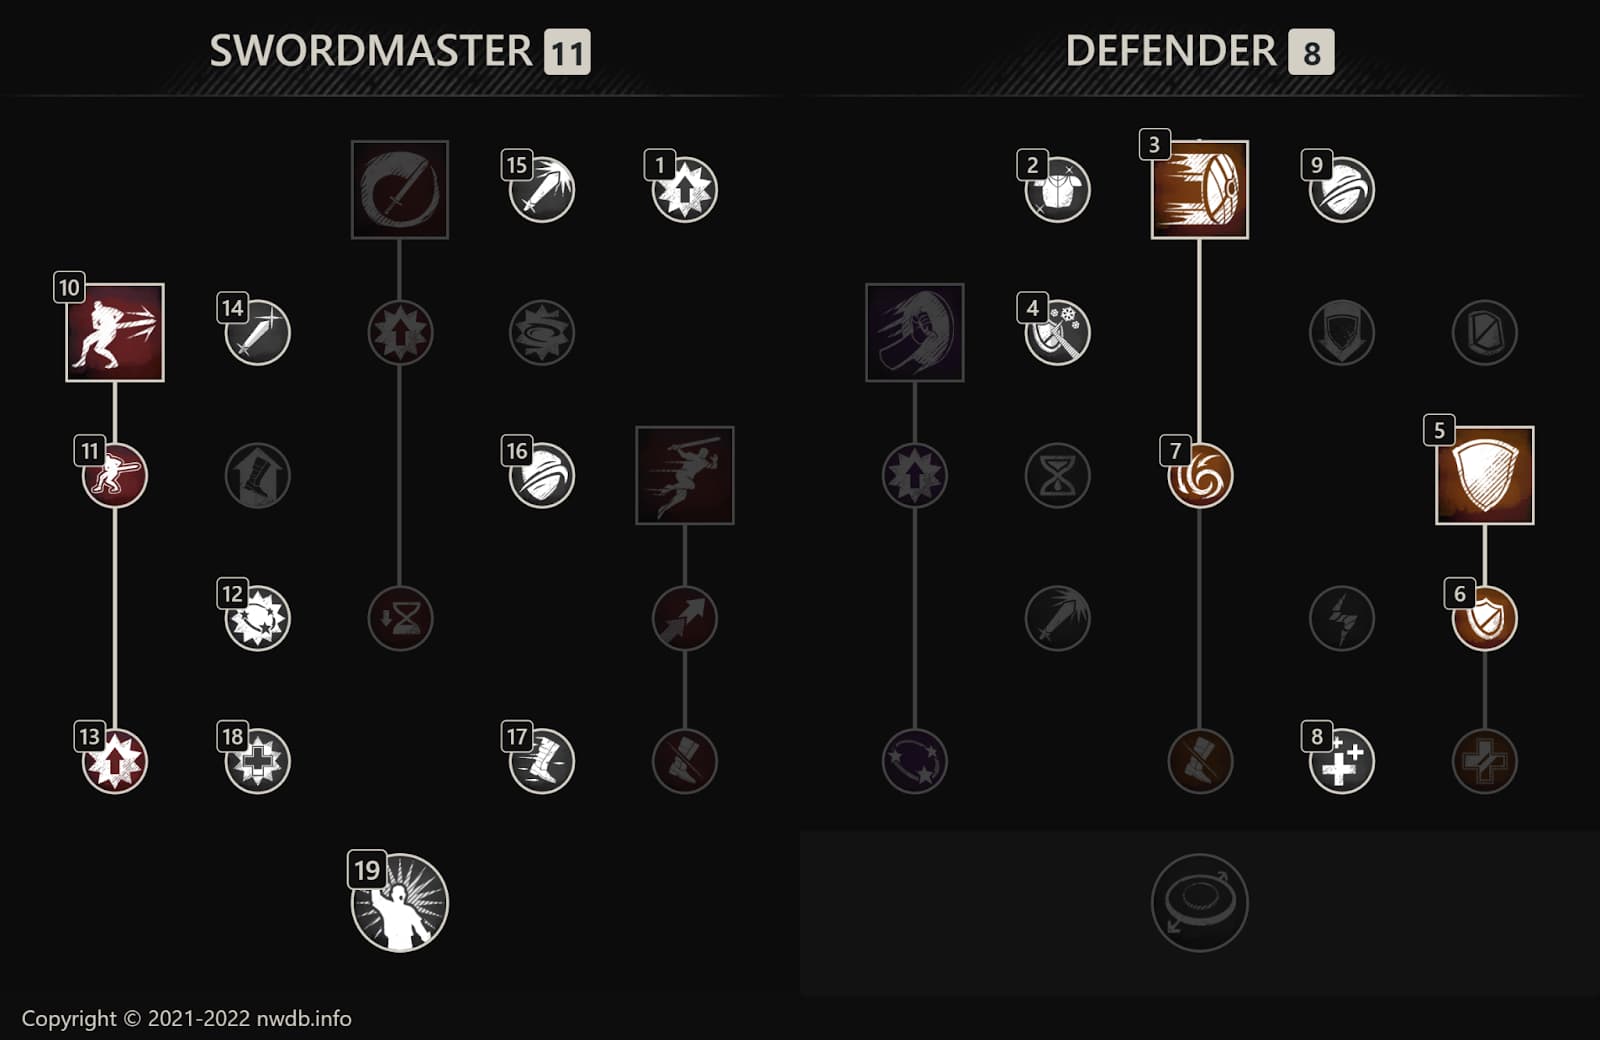
Sword &Amp; Shield
Aggressive Build
This loadout is for a more aggressive tanking build, focused slightly more on constant enemy assault than survivability.
Note: For your Sword & Shield tree, whether to choose the Freeing Justice or Confidence passive comes down to personal preference.
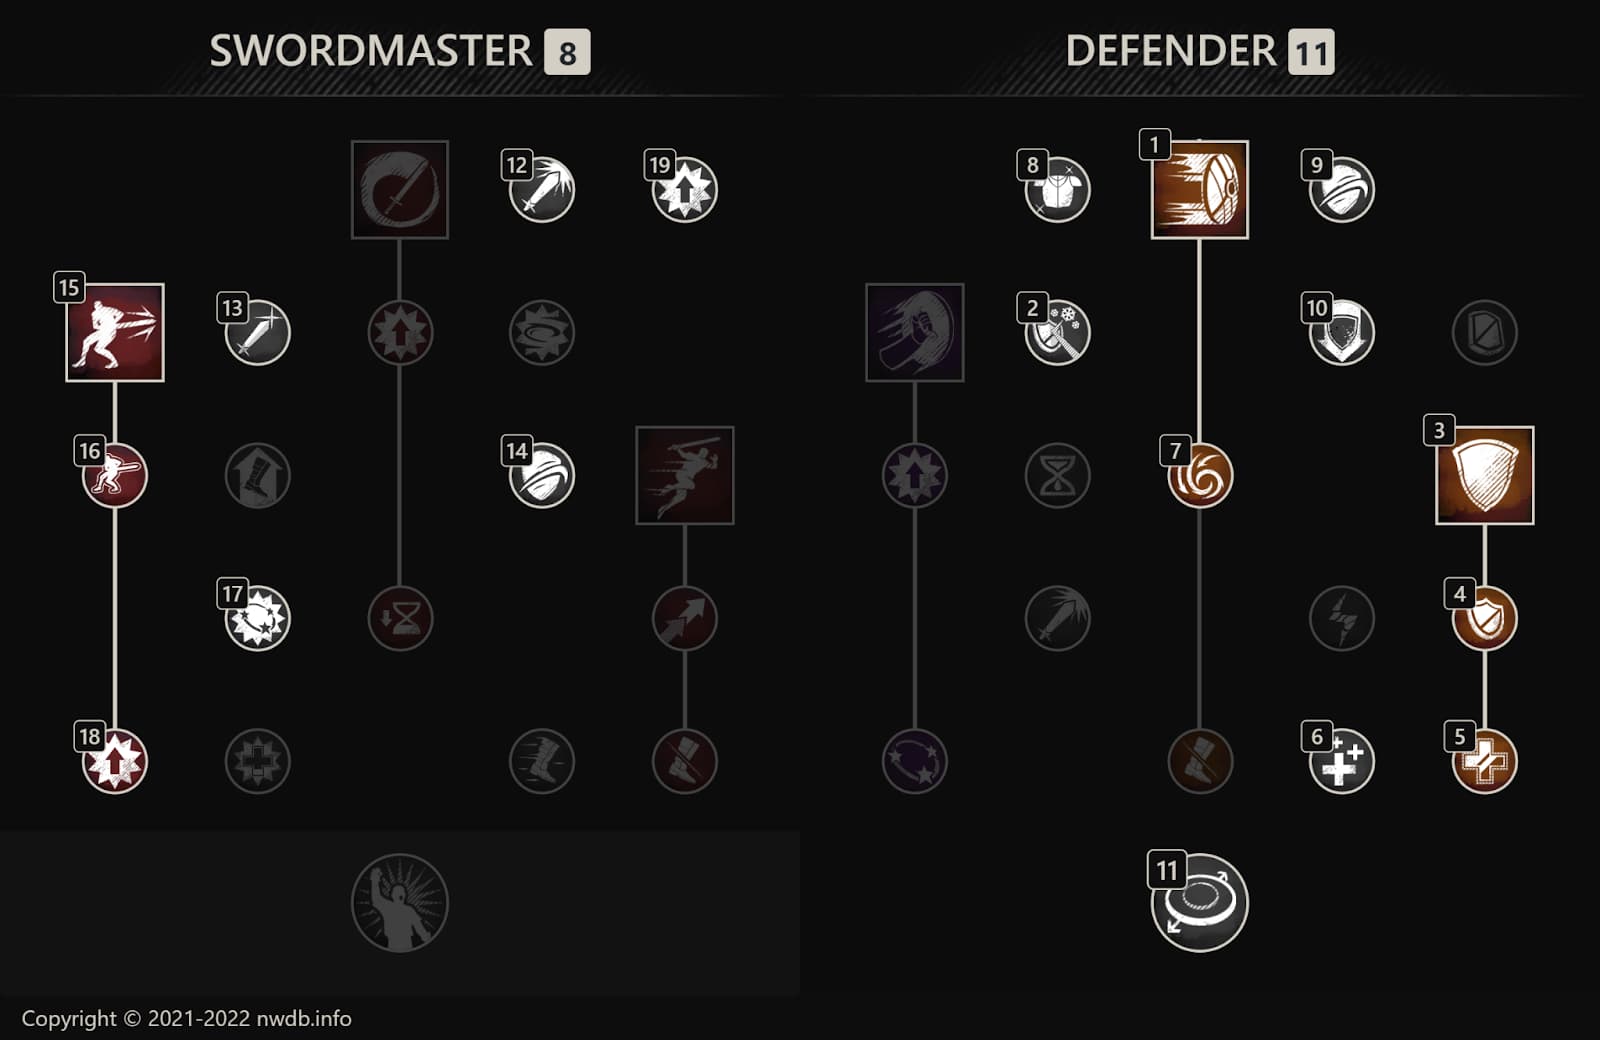
Defensive Build
The ideal loadout for a more defensive build, focused on better survivability and self-sustainability.
Greatsword
The only loadout needed for the Greatsword skill tree, as it can be used for both defensive and aggressive tanking.
Compatible with either of the War Hammer loadouts and the Hatchet loadout.

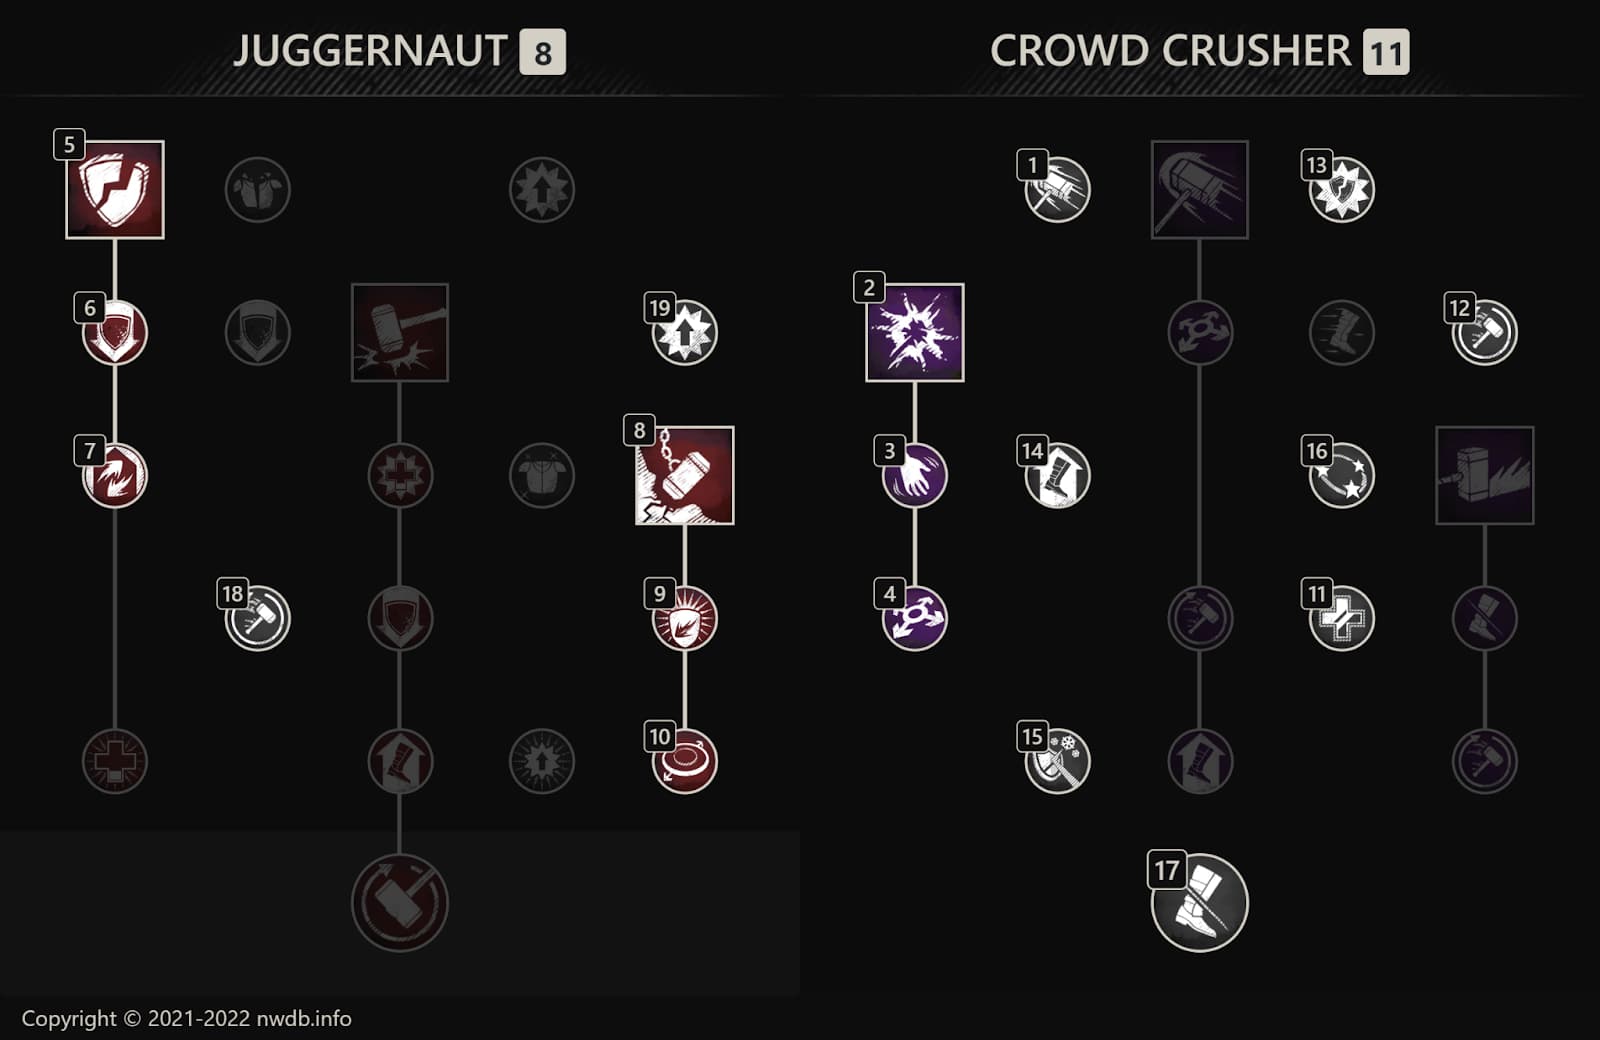
War Hammer
Aggresive Build
The best loadout for a more aggressive playstyle, placing focus on relentless attacks.
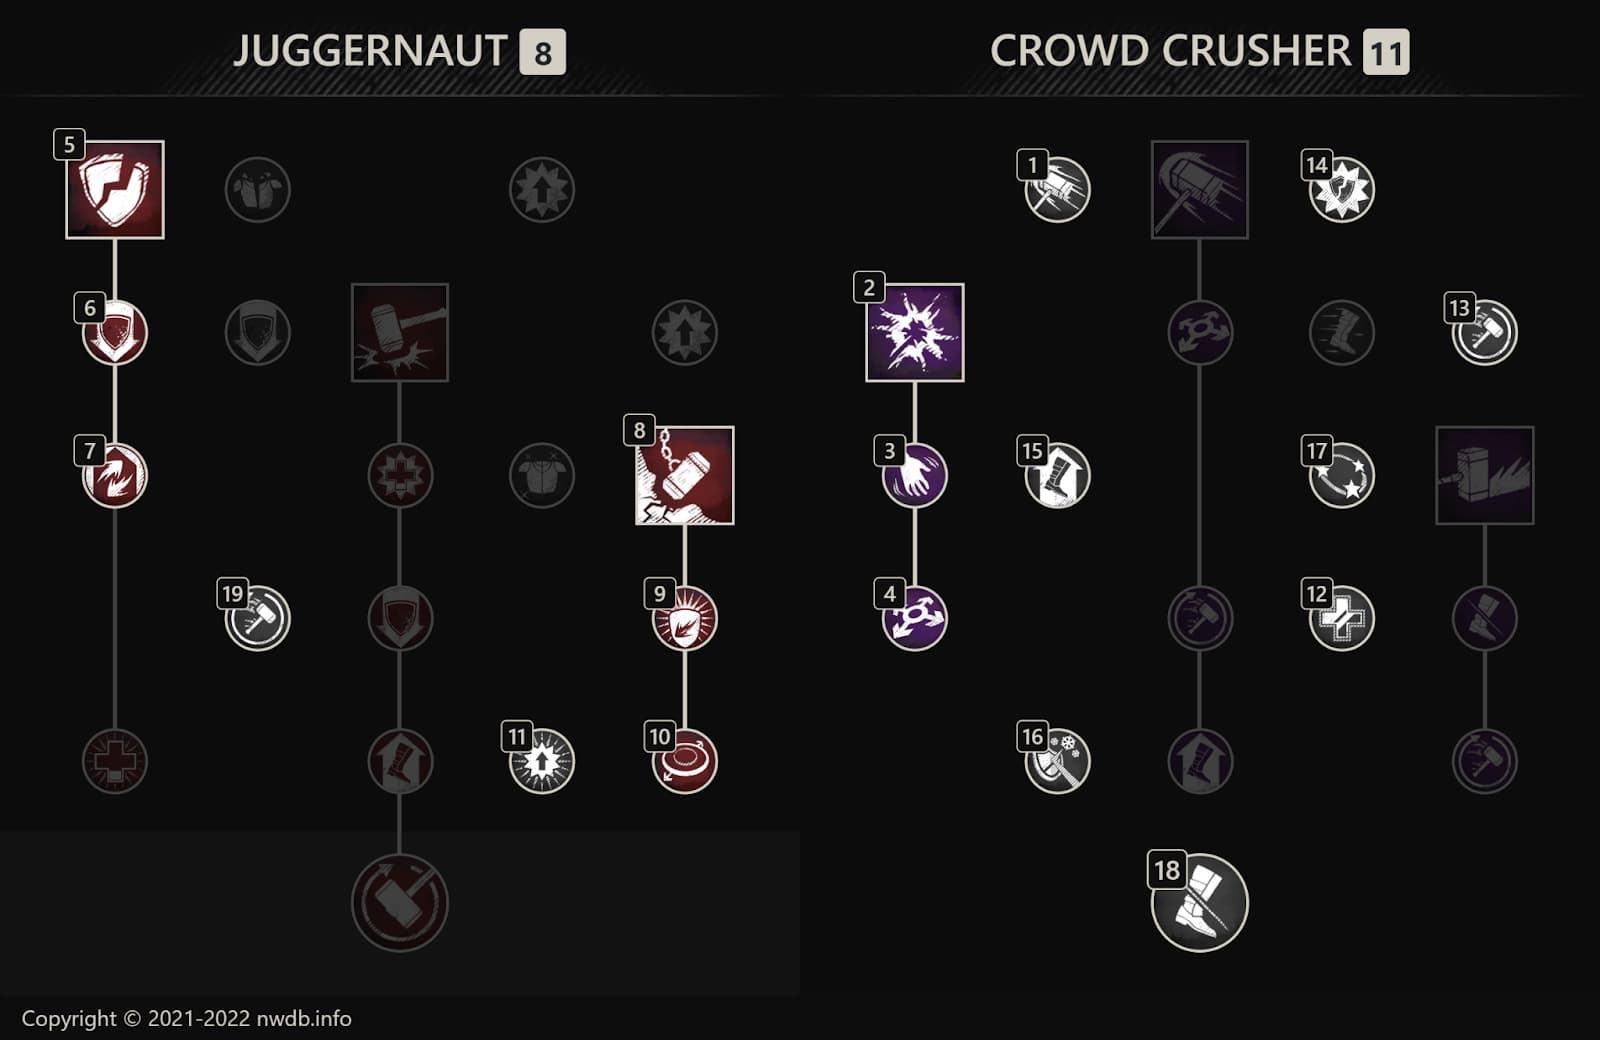
Defensive Build
The loadout best used in a defensive build, with a greater focus on crowd control.
Note: Choose Hardened Steel instead of Power Through Pain in the War Hammer tree if you are running a 210 Strength + 300 Constitution build, as you do not have GRIT on Light/Heavy Attacks.
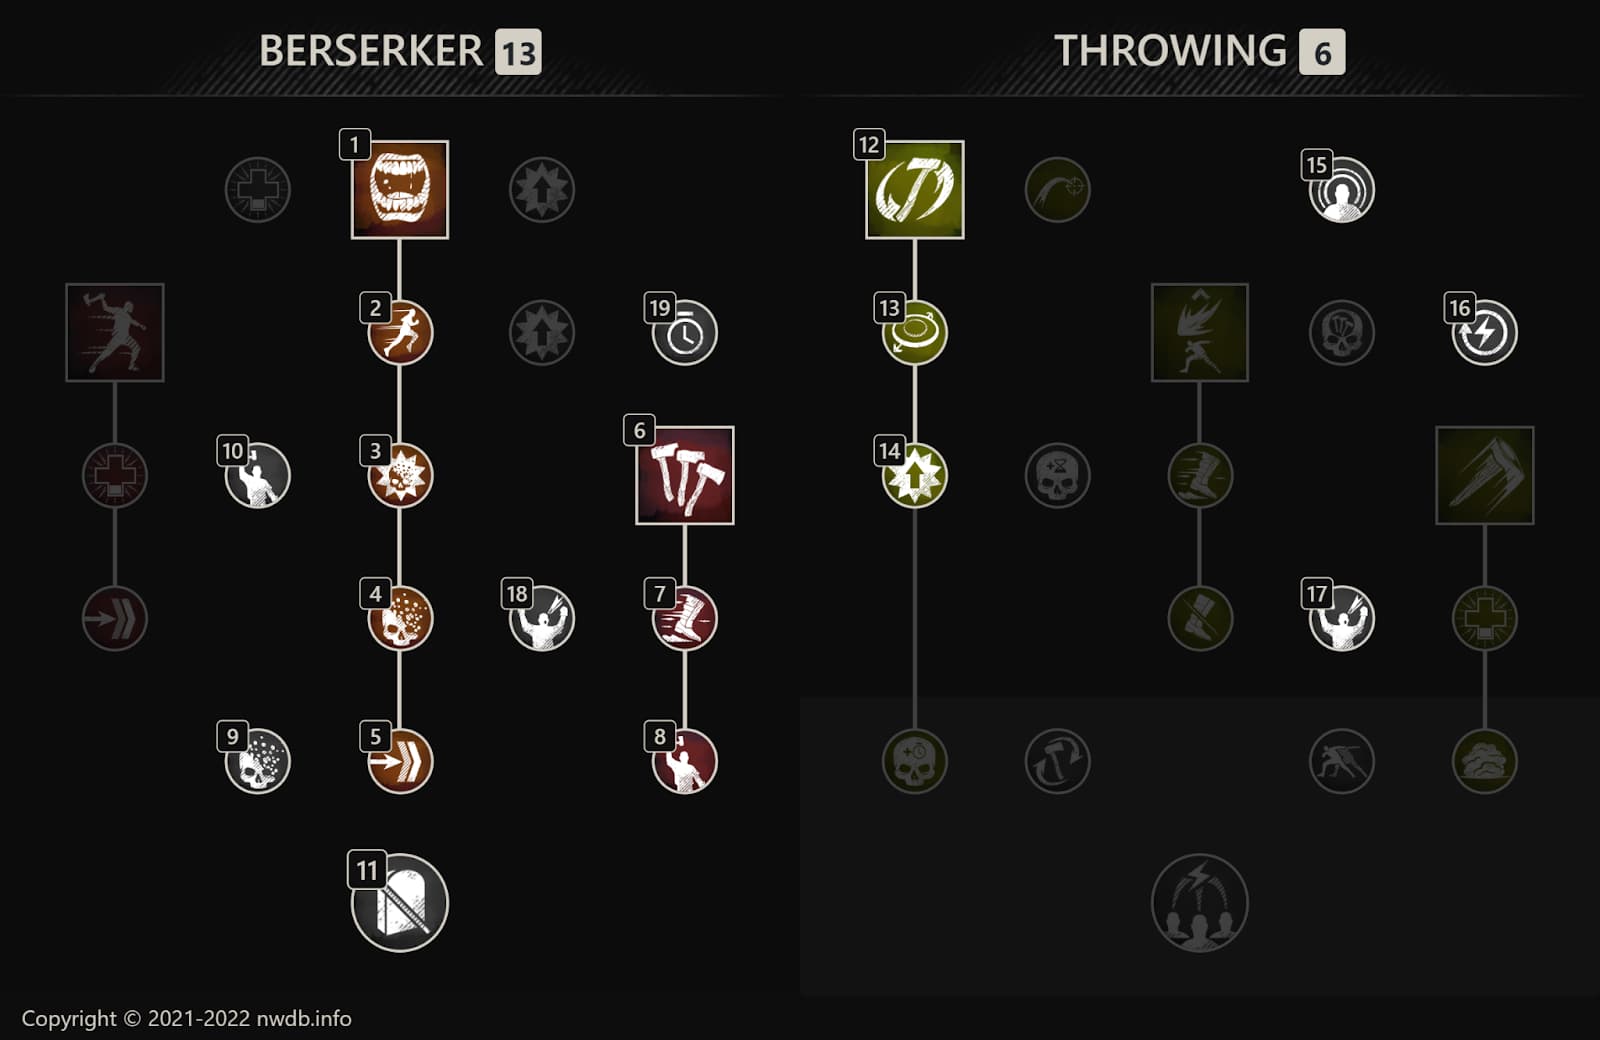
Hatchet
The only loadout needed for the Hatchet skill tree, as it can be used for both defensive and aggressive tanking.
Pair with either of the Sword & Shield loadouts or the Greatsword loadout.
Equip Load
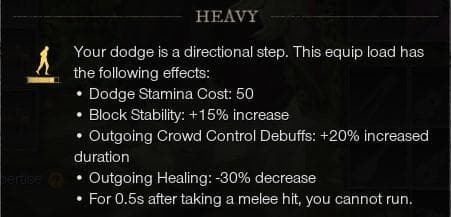
Heavy Armor
Heavy Equip Load is your standard build. It gives more block stability and increased duration on stuns, slows etc. To achieve this, every Armor Piece should be Heavy. Swords must be paired with a Tower Shield.
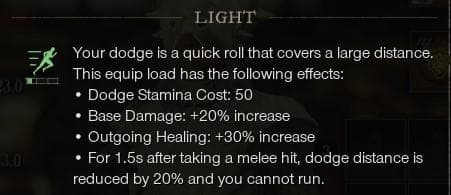
Light Armor
Light Equip Load is a speedrun build. It is not generally recommended for open world or classic tanking. To achieve this, every Armor Piece should be Light. Swords should be paired with a Round Shield.
Note: We will only be covering Heavy Armor tanking in this guide.
Perks to Aim For
Sword
For 300+ Strength builds, you should be looking for a Sword with ![]() Refreshing Move,
Refreshing Move, ![]() Thwarting Strikes, and a Bane Perk.
Thwarting Strikes, and a Bane Perk.
For under 300 Strength builds, your Sword should have ![]() Refreshing Move,
Refreshing Move, ![]() Enchanted, and a Bane Perk.
Enchanted, and a Bane Perk.
Greatsword
For 300+ Strength builds, your Greatsword should have ![]() Refreshing Move,
Refreshing Move, ![]() Thwarting Strikes, and a Bane Perk.
Thwarting Strikes, and a Bane Perk.
For under 300 Strength builds, your ideal Greatsword will have ![]() Refreshing Move,
Refreshing Move, ![]() Trenchant Strikes or
Trenchant Strikes or ![]() Enchanted, and a Bane Perk.
Enchanted, and a Bane Perk.
War Hammer
Regardless of which build you are running, your War Hammer should have ![]() Sundering Shockwave as a must, as well as any combination of
Sundering Shockwave as a must, as well as any combination of ![]() Keenly Empowered,
Keenly Empowered, ![]() Thwarting Strikes, any of the Bane Perks,
Thwarting Strikes, any of the Bane Perks, ![]() Hated,
Hated, ![]() Keen, or
Keen, or ![]() Vicious.
Vicious.
That said, if you are running a 300+ Strength build, your ideal War Hammer will have ![]() Sundering Shockwave and
Sundering Shockwave and ![]() Thwarting Strikes as a must, as well as any combination of
Thwarting Strikes as a must, as well as any combination of ![]() Keenly Empowered, any of the Bane Perks,
Keenly Empowered, any of the Bane Perks, ![]() Hated,
Hated, ![]() Keen, or
Keen, or ![]() Vicious.
Vicious.
Hatchet
Regardless of which build you are running, you should aim to have a Hatchet with ![]() Refreshing Torrent as a must, as well as any combination of
Refreshing Torrent as a must, as well as any combination of ![]() Refreshing Move, a relevant Ability perk,
Refreshing Move, a relevant Ability perk, ![]() Hated,
Hated, ![]() Keen,
Keen, ![]() Vicious,
Vicious, ![]() Keenly Empowered.
Keenly Empowered.
![]() Thwarting Strikes is also a great perk option, but should only be used if you are running a 300+ Strength build.
Thwarting Strikes is also a great perk option, but should only be used if you are running a 300+ Strength build.
Tower Shield (Epic)
You should aim to have a Tower Shield with ![]() Fortifying Shield Rush,
Fortifying Shield Rush, ![]() Sturdy, and
Sturdy, and ![]() Sturdy Energy.
Sturdy Energy.
However, if you already have ![]() Sturdy Energy on your Chest, or find it easier to acquire a good Chest piece than a best-in-slot shield, you can swap out the last Tower Shield perk for
Sturdy Energy on your Chest, or find it easier to acquire a good Chest piece than a best-in-slot shield, you can swap out the last Tower Shield perk for ![]() Refreshing,
Refreshing, ![]() Hated, or any of the Shield Ward Perks.
Hated, or any of the Shield Ward Perks.
Note: Before the Brimstone patch, there was a bug that allowed players to craft Legendary shields, with 4 perks, using a ![]() Runestone Stopwatch. This is no longer possible, but you might be able to find one on the Trading Post.
Runestone Stopwatch. This is no longer possible, but you might be able to find one on the Trading Post.
Armor
It is a really good idea to eventually have an armor set for every enemy type. Every armor piece in each set should have the specific Enemy Type Ward Perk as standard, as well as any combination of ![]() Refreshing,
Refreshing, ![]() Physical Aversion,
Physical Aversion, ![]() Elemental Aversion, and a relevant Ability Perk.
Elemental Aversion, and a relevant Ability Perk. ![]() Sturdy Energy is also a great perk, but should only be used on the Chest piece, and is only needed if you do not have a Tower Shield with the perk.
Sturdy Energy is also a great perk, but should only be used on the Chest piece, and is only needed if you do not have a Tower Shield with the perk.
Amulet
For your Amulet, you want to be looking for ![]() Divine and
Divine and ![]() Health, plus your choice of
Health, plus your choice of ![]() Fortified,
Fortified, ![]() Stamina Recovery, or any of the Protection Perks.
Stamina Recovery, or any of the Protection Perks.
Ring
For your Ring, you will want ![]() Hearty as a must, as well as your choice of
Hearty as a must, as well as your choice of ![]() Enfeebling,
Enfeebling, ![]() Slash Damage,
Slash Damage, ![]() Leeching,
Leeching, ![]() Keen Awareness, or
Keen Awareness, or ![]() Refreshing.
Refreshing.
Earring
For your Earring, you will want ![]() Refreshing Toast as a must, alongside any combination of
Refreshing Toast as a must, alongside any combination of ![]() Despised,
Despised, ![]() Refreshing,
Refreshing, ![]() Regenerating,
Regenerating, ![]() Nimble, or
Nimble, or ![]() Healthy Toast.
Healthy Toast.
Ability Perks
It will help you as a tank to acquire certain Ability Perks on your Armor and Weapons. As a rule of thumb, it’s best to have your main weapon perk on your weapon. This is because perks on weapons get a huge power increase.
The recommended weapon ability perks were suggested above, with Tower Shields needing the ![]() Fortifying Shield Rush perk, Hatchets needing the
Fortifying Shield Rush perk, Hatchets needing the ![]() Refreshing Torrent perk, and War Hammers needing to have the
Refreshing Torrent perk, and War Hammers needing to have the ![]() Sundering Shockwave perk.
Sundering Shockwave perk.
Every other Sword, Shield, Greatsword, Hatchet and War Hammer perk is best to have on your armor. Some recommended armor ability perks to include on your armor as a tank are ![]() Penetrating Wrecking Ball,
Penetrating Wrecking Ball, ![]() Contagious Upheaval,
Contagious Upheaval, ![]() Accelerated Resolve,
Accelerated Resolve, ![]() Leeching Crosscut, and
Leeching Crosscut, and ![]() Energizing Counter.
Energizing Counter.
Best Drops to Farm
Swords
 Guardian's Resolve for any Corrupted Dungeons.
 Deeproot or
  Infernus due to their Lifestealing for some sustain.
 Darion's Spatha or Timekeeper's Hand are similar swords, both good for increased DPS.
 Grovewarden for
  Garden of Genesis runs.
- Blackguard's Longsword can be useful against enemies that are weak to Thrust Damage, as it rewards heavy attacks.
Greatswords
 Soulstep for use against Lost Enemies.
 Berserker's Sword is a good all-rounder for any expedition or fight.
 Unyielding Cleaver a strong DPS option but has the unusual perk of Sure Footing, so could also be useful for main Greatsword tanks.
War Hammers
 Entertainer's Maul has the Hated perk, which can be useful if you’re running low strength.
 End of Days is a more aggressive Warhammer.
 Batheqet's Cudgel for use against Ancient enemies.
- Blackguard's War Hammer, only viable for 300+ Strength builds.
Hatchets
 Beyond Reason is close to BiS for fighting Ancient Enemies.
 Dreadwake is a good all-rounder for any expedition or fight.
 Blackguard's Hatchet, only viable for 300+ Strength builds.
Tower Shields
 Titanwall, as long as you have
  Sturdy Energy on your Chest.
Armor
 Neishatun's Set is good as a starter set for non-mutated expeditions.
 Spectral Tempestuous Set (Soldier) is a great starter set for Corrupted mutations, but only a viable drop from boxes after you are 590+ Expertise.
 Expedition Captain's Set is the upgraded set for Corrupted mutations.
 Harbinger Set is good for Angry Earth mutations
 Corrupted Rage Set is good for Ancient mutations.
 Chardis Set is another good set for Ancient mutations.
 Brined Set is a great set for Lost mutations, but it only drops while you are in mutated Barnacles and Black Powder.
Amulets
 Reinforced Tempestuous Amulet of the Soldier is a great starter piece, though it is only a viable drop from boxes after you are 590+ Expertise.
 Blessing of Forefathers has
  Health and
  Divine which are two staple tanking perks.
Rings
 Smooth Bone Ring for self-sustain.
- Forgotten Vow for extra weaken duration.
 Heart of Hepu, again for extra weaken duration.
- Heart of Maahebgal for max DPS.
Earrings
 Doom's Chance Earring is well balanced for all types of tanking.
 Teardrop is used for Greatsword or Hatchet Tanking, due to the value of
  Refreshing Ward.
- Priestess Charm has Nimble and Refreshing Evasion, making it good for defensive, dodge-centric tanking.
Heartrunes
 Brutal Heartrune of Grasping Vines can be used on large groups of enemies to lower incoming damage and increase how much damage they take through the 20% Weaken and Rend respectively.
Note: This Heartrune does lower your Stamina regeneration after activation, so make sure to have defiant stance - Path of Defiance - or a similar cooldown ready to go to lower your incoming damage, as blocking too much whilst it’s active will exhaust you.
 Brutal Heartrune of Dark Ascent is an alternative option, and whilst it provides less support to your team due to not offering any weaken, rend or root, it can be used to give you a large amount of health back when activated on groups of enemies.
 Stalwart Heartrune of Stoneform is a decent option for tanks using under 300 Strength, as it prevents you from being interrupted or staggered by enemies for the duration that it is active.
Gems
Important: In order to do any tanking in New World, you will need ![]() Carnelian Gems.
Carnelian Gems.
Most of the damage you will take will be Physical in Normal expeditions, so stacking ![]() Onyx Gems for their physical protection or
Onyx Gems for their physical protection or ![]() Diamond Gems, which offers both Physical and Elemental protection (though at a reduced rate), will be beneficial for you.
Diamond Gems, which offers both Physical and Elemental protection (though at a reduced rate), will be beneficial for you.
In Mutated Expeditions, it’s worth swapping out 2 to 3 of your gems to counter the specific Mutation, such as ![]() Ruby Gems for Fire Mutations,
Ruby Gems for Fire Mutations, ![]() Amber Gems for Nature Mutations, and so on.
Amber Gems for Nature Mutations, and so on.
Stacking ![]() Opal Gems will provide cover for all elements, but at a weaker % than specifically targeting each mutation.
Opal Gems will provide cover for all elements, but at a weaker % than specifically targeting each mutation.
It may, however, be worth choosing to have your unswapped, non-mutation specific gems as ![]() Opal, instead of
Opal, instead of ![]() Onyx or
Onyx or ![]() Diamond as suggested before, if you’re interested in Mutated expeditions only.
Diamond as suggested before, if you’re interested in Mutated expeditions only.
In your Jewelry, the same rules can be applied. For your Amulet, Ring and Earring, stick to ![]() Onyx,
Onyx, ![]() Diamond or
Diamond or ![]() Malachite for Normal Expeditions, or
Malachite for Normal Expeditions, or ![]() Opal to focus on Mutated.
Opal to focus on Mutated.
Runeglass
A long-term goal is to find or craft multiple Amulets that have ![]() Health plus a specific Elemental Protection perk, and also a relevant gem for that protection. For example A
Health plus a specific Elemental Protection perk, and also a relevant gem for that protection. For example A ![]() Health and
Health and ![]() Frozen Protection amulet made with an
Frozen Protection amulet made with an ![]() Aquamarine would be excellent to swap to for Ice Mutations, and having a Fire, Nature and Void equivalent also sitting in your bag gives you plenty of versatility, making it less necessary to swap out gems in your armor, so you can permanently socket some Runeglass Gems into your armor pieces instead.
Aquamarine would be excellent to swap to for Ice Mutations, and having a Fire, Nature and Void equivalent also sitting in your bag gives you plenty of versatility, making it less necessary to swap out gems in your armor, so you can permanently socket some Runeglass Gems into your armor pieces instead.
Runeglass gems should be added to your most used tanking gear. Avoid swapping them out for different weekly mutations as it will be very expensive to do so. If you do want to have Runeglass sockets in abundance, it is better to have a good armor set for each enemy and mutation type, and adding Runeglass gems to these, rather than swapping them out all the time.
Which Runeglass gems you put in your armor can be personal preference, but I recommend ![]() Runeglass of Energizing Diamond or
Runeglass of Energizing Diamond or ![]() Runeglass of Energizing Malachite to help maintain Stamina with Sword and Shield Tanking.
Runeglass of Energizing Malachite to help maintain Stamina with Sword and Shield Tanking.
![]() Runeglass of Punishing Diamond or
Runeglass of Punishing Diamond or ![]() Runeglass of Punishing Malachite is a good choice if you tank with Greatsword, as it will maximize your outgoing damage. Avoid Energizing Runeglass as a Greatsword tank, as the Greatsword already has great Stamina management thanks to its perks and talents.
Runeglass of Punishing Malachite is a good choice if you tank with Greatsword, as it will maximize your outgoing damage. Avoid Energizing Runeglass as a Greatsword tank, as the Greatsword already has great Stamina management thanks to its perks and talents.
You should use a ![]() Runeglass of Energizing Carnelian in your Weapons, but as mentioned at the start of the section, if you don’t have access to Runeglass, you must stick to a normal
Runeglass of Energizing Carnelian in your Weapons, but as mentioned at the start of the section, if you don’t have access to Runeglass, you must stick to a normal ![]() Cut Pristine Carnelian until you do. Carnelians are mandatory to activate taunts on your abilities, and so are essential to your role as a tank.
Cut Pristine Carnelian until you do. Carnelians are mandatory to activate taunts on your abilities, and so are essential to your role as a tank.
Tips for Tanking
Playstyle Tips
When running Mutated expeditions, swapping 3 elemental resistance gems for different mutations is a good number to aim for. Keep the 2 other gems as Opal or Malachite to provide general elemental damage absorption.
Do not just taunt then raise your shield and stand there. Efficient tanking requires putting out good damage to hold the attention of enemies, and blocking when falling to lower health.
When tanking enemies, try to keep them faced towards you and away from your team. This will help your team do more damage due to critical backstabs, and also help them avoid getting cleaved by any attacks the enemy may be doing.
Look for any ranged enemies when clearing out rooms/areas, and try to cluster any melee enemies next to them. This will make it easier for both you and your damage dealers to kill everything at the same time, and save the healer from pulling threat on these ranged mobs.
Learn to feel the difference between a Heavy Attack (hold and release LMB after 1 second) and a Charged Heavy (hold down LMB for 2+ seconds). Charged heavy attacks with a Sword become Thrust Damage instead of Slashing.
Ability Rotation
Don’t rely on opening with Defiant Stance. ![]() Shockwave is often a better taunt opener as it also applies a Stun, Slow, and Rend from
Shockwave is often a better taunt opener as it also applies a Stun, Slow, and Rend from ![]() Sundering Shockwave.
Sundering Shockwave.
It's good to keep Shockwave on cooldown - if in doubt, use it, as it provides a lot of support to your team.
If you are using Sword and Shield in your tank setup, it is recommended to be performing Light and Heavy attacks with the Sword instead of your other weapon, especially when your gear has ![]() Refreshing Move, as this will help you cycle into your defensive cooldowns more often.
Refreshing Move, as this will help you cycle into your defensive cooldowns more often.
Maintain as much rend as you can on bosses. It's important in many scenarios. For example, when running Genesis, using ![]() Armor Breaker against Alluvium Marl, the Caretaker can help you prevent party wipes during the Vine Wall phase of the fight.
Armor Breaker against Alluvium Marl, the Caretaker can help you prevent party wipes during the Vine Wall phase of the fight.
About the author
BagginsTV A partnered Twitch streamer and fulltime YouTuber, Baggins is a New World guru and healer main creating in-depth guides and tips, tricks and tactics content to help players improve and excel in-game. 

Any chance for an update to this since the latest combat reworks? Really appreciate the time you put into making this guide but not sure how well it holds up anymore given GRIT on basics is now on constitution for example